
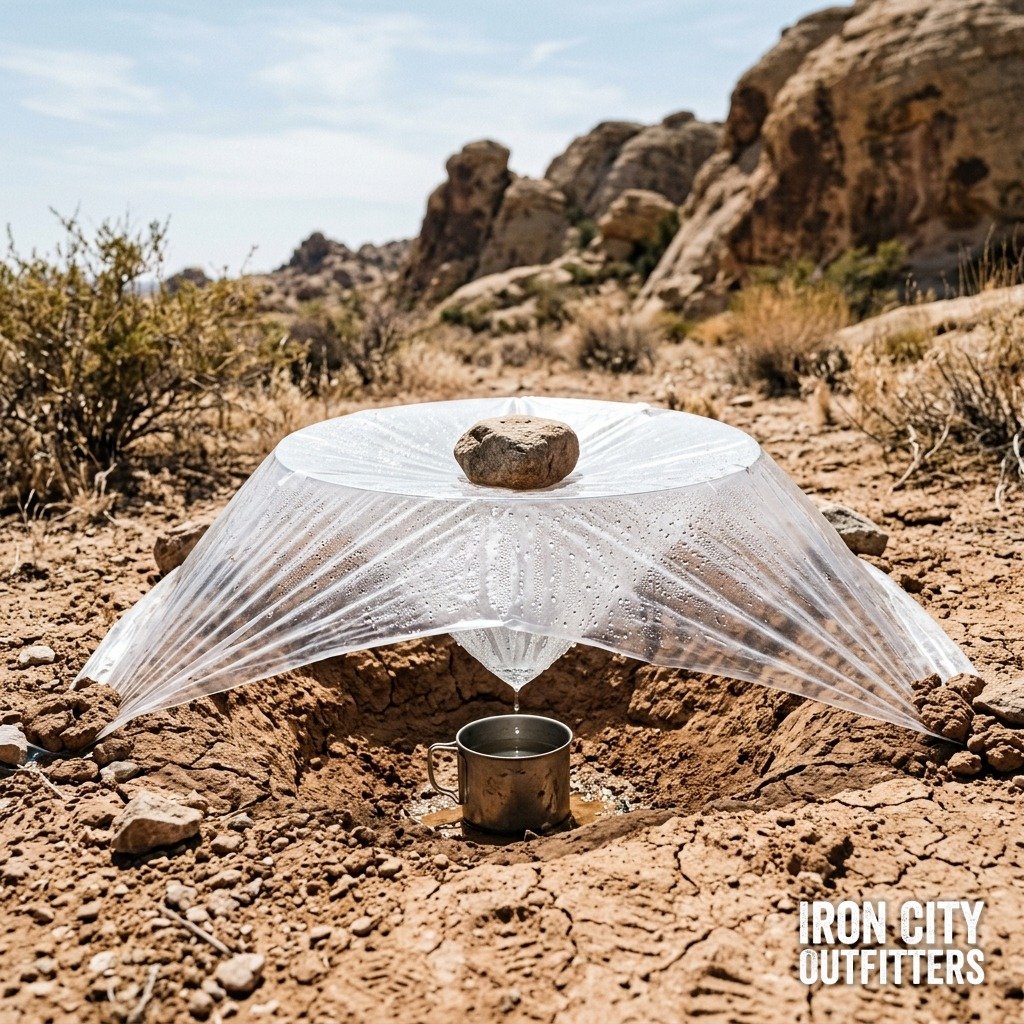
Dehydration onset begins within hours once the last bottle runs dry, and cognitive sharpness and physical output degrade long before thirst becomes unbearable. On sun-baked ridgelines, dry washes, and scrubland with no visible surface water for miles, the gap between a recoverable situation and a critical one often comes down to a technique requiring no fuel, no filtration cartridge, and nothing more than a single sheet of plastic already stashed in a pack.
The solar still runs on a simple thermodynamic cycle. Solar radiation heats soil and any moisture-bearing vegetation sealed beneath a sheet of clear plastic, driving evaporation upward. Water vapor rises, contacts the cooler underside of the plastic, and condenses into droplets through the same greenhouse effect that traps heat inside a parked vehicle. Gravity pulls those droplets toward a low, center-weighted point, funneling clean, distilled water into a collection vessel below — regardless of how saline, muddy, or contaminated the surrounding soil happens to be. Because the water undergoes a full phase change from vapor back to liquid, pathogens, salts, and sediment stay behind in the pit.
Click Here to Copy This Survival Protocol & Field Checklist — the full construction sequence and materials checklist are laid out below.
Expect modest yield: roughly half a liter to a liter per 24-hour solar cycle under strong sun, making the still a supplemental or contingency source rather than a primary water strategy. Digging and deploying several stills at once, spaced across the highest-moisture soil available, multiplies total daily output and buys critical time until resupply or extraction becomes possible.
Field Protocol & Checklist
Materials: one clear plastic sheet (6×6 ft or larger), a digging tool or sturdy stick, a collection container, a short length of tubing (optional), and a fist-sized rock.
- Locate ground with visible moisture indicators — green vegetation, shaded low ground, or a dry streambed — that also receives direct sun for most of the day.
- Dig a bowl-shaped pit roughly 3 feet wide and 2 feet deep, tapering toward a low center point.
- Set the collection container upright at the pit’s lowest point.
- Line the pit’s inner walls with cut green vegetation to raise the moisture available for evaporation.
- Stretch the plastic sheet flat across the pit opening and anchor the edges with soil, rocks, or packed earth to form an airtight seal.
- Place the rock at the center of the sheet directly above the container, pressing the plastic into an inverted cone without letting it touch the container itself.
- Leave the still undisturbed through a full solar cycle, checking only at dawn and dusk to avoid breaking the seal.
- Rotate to a fresh pit location every 24 to 48 hours as soil moisture in the current site depletes.
Assisted by AI; content may contain inaccuracies.